Showing posts with label art craft. Show all posts

Sunday, August 26, 2012

1,2,3,4,5 once I got a Fish alive


source: crafttoart.com


Thursday, August 09, 2012

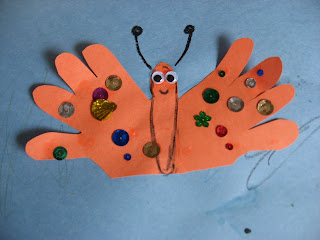
Hand Cut Butterflies

(Source: Notimeforflashcard.com)


Gather your materials. You will need 2 pieces of construction paper,scissors, crayons, glue,googly eyes and some sequins.


Start by tracing your child’s hands.


Next give them the 2nd piece of construction paper and have them draw whatever they want.
While they create a butterfly habitat or just scribble ( it’s all great practice and creativity!) cut out the hands and lay the thumbs on top of each other. Trim the bottom so it looks like a butterfly glue together. Older children can do this and should do the cutting if they can.


Glue onto the decorated paper.
I used a crayon to outline where the body was and some antennae.
Add the glue
Add the bling! Start with the eyes.


Next add lots of beautiful sequins. Picking up these tiny sequins is an awesome fine motor activity,encourage your child to pick them up making an O with their thumb and index finger,not by sliding them off the table.
Let dry !

Leaf Rubbing Tree

(Source: notimeforflashcard)


- Gather your materials. You will need a paper towel roll, some white paper, scissors, tape, crayons in fall colors with the paper removed and leaves from your garden.


- Start by going outside and finding some fun leaves , bringing them in and pat them dry if needed.

- Place the leaves vein side up under a piece of paper – for my son I taped the leaves onto a paper so they wouldn’t shift when he was trying to do the rubbing.


Rub your crayons over the paper and watch the magic leaf appear! You can see I still had to hold his paper steady.

Cut them out as you go.


Time to tape. We used tape because it would be very tricky to glue with white glue and our glue stick was MIA. A glue stick would work nicely as long as you glued it horizontally and waited until it was dry to stand it up.
Attach all the leaves and stand up!

Paper Plate Tortoise


Gather your materials. For this craft you will need a paper plate, some paint and paint brush, some paper, glue , scissors and crayons.

Paint the outside of your paper plate, I am using a foam brush because it minimizes mess , and isn’t that always a plus with young children?


While your child is painting the plate ( and possibly your table too) fold a piece of paper in at least 4, draw a shape of your choosing. I chose hexagons but any shape would do. Some shapes are hard to find in the real world so incorporating them into a craft like this is a great way to learn.


Cut the shape out.
Glue the shape on to the painted plate to create a cool shell!


While your child is gluing the shapes on , fold another piece of paper in 2, and draw the outline of four feet, a tail and a head. If you want you can have your child color these and add eyes and a mouth too!
Cut these out and glue them on the inside of the paper plate.


Sponge Painting

(Source: notimeforflashcard.com)

Sponge painting is a wonderful way for young children to explore paint, they don’t need to have superior fine motor skills to succeed at making a great finished piece of art, here’s the how to:

Gather your materials. For this art activity you will need a regular kitchen sponge, some paint, a paper plate or the like to put your paint on, paper and scissors.

- Cut the sponge into some good hand size shapes for your child. We’ve been learning about shapes so I made some , but you can cut out fish shapes, letters..the sky and your cutting ability is the limit!
- Spread some paint on a plate or tray and dip your sponge in.

I


like to mix colors as we paint, it’s fun and keep the kids interested, as well as asking them what shape or picture they are making with the sponge.

Wednesday, August 08, 2012

Experimenting With Texture: Homemade Paint Brushes and Texture Tools!


(Source: pinkandgreenmama.blogspot.com)

We made a homemade set of "texture" paint brushes
(and scrapers)
out of re-cycled/re-purposed materials.

Here are some photos of ours to get your creative brain juices flowing!

We gathered our materials:
Pipe Cleaners
(chenille stems, as Martha would say)
Rubber Bands
Yarn
Craft Foam
Sponges
Wooden Clothespins
Old Toothbrushes
Wooden Handles
(I saved from those little disposable foam craft brushes!)
Cardboard Scraps

Then, we got to work cutting-up and rubber-banding different
various materials to the wooden handles to make "brushes".

By cutting different designs in pieces cardboard
we could make different designs
when we scraped and dragged it through our paint.

When they get soggy and floppy, just toss them in the recycling!

(Psst.... Plastic hair combs are fun to do this with too!)

I set out blank sheets of office copy paper
and some bowls of washable craft paint
and asked "C" to show me how we should use these new tools.

We used Clothespins for a few handles too!

It was fun to cut loose for an hour yesterday
and experiment with the different tools.

We ended up with all kinds of pretty and funky papers.

(I see Eric Carle-inspired collage-making in our future!)

Wine corks make good circle stamps
(think: homemade dot-a-dot markers!)

Fingers make pretty neat "texture tools" too!

Happy Texture Making!