Showing posts with label Montessori. Show all posts

Tuesday, October 30, 2012

Exploring Weight {Sensorial Montessori Activity}

http://www.smilinglikesunshine.com/2012/10/exploring-weight-sensorial-montessori.html


A couple of weeks ago I prepared these treasure boxes for an activity to explore weight.
As you may know, sensorial activities are very important in the Montessori philosophy. Exploring the weight by the sense of touch is called the baric sense. In a Montessori classroom, children are supplied with baric tablets to develop and refine their baric senses.

Here are my Baric Chests:


Materials:


A blindfold (optional)
A mat
4 sets of wooden chests, filled with pebbles and bubble wrap to ensure the pebbles do not make any sound. Each set consists of two chests. Each of the wooden chests is plain and the same colour. To mark the same weight chests, stickers are used.
The weight of the sets is as follows:
The lightest set is empty, each chest is 40gr, colour coded with a green sticker,
The second set consists of chests each measuring 72gr, colour coded with yellow stickers,
The third set consists of chests each measuring 104gr, colour coded with orange stickers,
The heaviest set consists of chests each measuring 136gr, colour coded with blue stickers.
The difference between each set is 32gr.


Direct objective: Developing and refining the baric sense so that small differences in weight can be differentiated by the child.
Indirect objective:
· Becoming a good observer
· Gaining a perception of weight,
· Gaining awareness in differentiating the differences between weights
· Developing the language: At the end of the activity the child will have learnt the words: heavy, heavier, heaviest, light, lighter, lightest, as heavy/light as
Advance preparation for the lesson: Before starting the activity both the teacher and the student wash their hands as this helps sensitise the fingers.
PRESENTATION:
1. The teacher brings the materials to the rug. The teacher and the child sit opposite each other.
2. The teacher then takes out the lightest and the heaviest chests.
3. S/he puts the chests on his/her hands: palm up, arms relaxed.
4. The teacher shows the child how to weigh the chests, by moving both hands, with palm facing outward in an up down motion. The teacher moves her arms up and down slightly, to perceive the differences in weight.
5. S/he places them on the mat and invites the child to feel the weights of the chests
6. S/he puts the chests on the child’s finger tips, and then asks “Which one is lighter?” “Which one is heavier?” The teacher removes the chests and puts them on the mat
7. Carrying on with different chests, the teacher asks the child if they are heavy, light or are the same. The teacher continues removing the chests and putting them on the mat next to previously used chests as the child answers the questions.
8. When all chests are done,the teacher starts the activity again. This time s/he asks the child “Can you give me the heavier chest?” “Can you give me the lighter chest?” repeating until all chests are estimated.
9. The child takes off the blindfold and the teacher explains what has been done.
Differentiation:
If the child does not feel secure and does not want to use the blindfold, s/he can do the activity by averting his/her eyes.
Older children can use a scale to check if they have sorted the chests correctly.

As a control of error element, I added stickers on the bottom of the chests.


Wednesday, August 08, 2012

Experimenting With Texture: Homemade Paint Brushes and Texture Tools!


(Source: pinkandgreenmama.blogspot.com)

We made a homemade set of "texture" paint brushes
(and scrapers)
out of re-cycled/re-purposed materials.

Here are some photos of ours to get your creative brain juices flowing!

We gathered our materials:
Pipe Cleaners
(chenille stems, as Martha would say)
Rubber Bands
Yarn
Craft Foam
Sponges
Wooden Clothespins
Old Toothbrushes
Wooden Handles
(I saved from those little disposable foam craft brushes!)
Cardboard Scraps

Then, we got to work cutting-up and rubber-banding different
various materials to the wooden handles to make "brushes".

By cutting different designs in pieces cardboard
we could make different designs
when we scraped and dragged it through our paint.

When they get soggy and floppy, just toss them in the recycling!

(Psst.... Plastic hair combs are fun to do this with too!)

I set out blank sheets of office copy paper
and some bowls of washable craft paint
and asked "C" to show me how we should use these new tools.

We used Clothespins for a few handles too!

It was fun to cut loose for an hour yesterday
and experiment with the different tools.

We ended up with all kinds of pretty and funky papers.

(I see Eric Carle-inspired collage-making in our future!)

Wine corks make good circle stamps
(think: homemade dot-a-dot markers!)

Fingers make pretty neat "texture tools" too!

Happy Texture Making!

Tuesday, August 07, 2012

August Sensory Tub & Playdough - Ice Cream!

(Source: Countingcoconut.com)

Ice Cream Shoppe Tub
What's inside:
:: LOTS of colorful homemade pom-poms (aka scoops of chocolate, mint, strawberry and vanilla ice cream!)
:: Silicone cones - these were a surprisingly cheap find at a local store
:: Ice cream scoop and spoon
:: Little red beads - James calls these "cherries" :)
:: Small sundae cup and bowls
:: Sprinkles - because of ants, humidity and what's sure to be sticky fingers I'm keeping these sealed!
:: Wooden banana (for a banana split, of course!)


This dough is so much fun to play with - James LOVES it! It smells delicious and the colors look so pretty all mixed together. :) Oh and bonus, all that tearing and pinching of the dough is excellent for strengthening those little fingers!

Now for the pom-pom tutorial. These are SO quick and easy peasy to create - each one took me only a minute or so to make. I remember making these with my sister when we were kids. This would be a fun activity for children who know how to cut and tie.

Here's what you'll need:
:: Yarn - this is a great way to use up leftover bits. I used whatever I had on hand, but I would recommend chunky weight yarn for these.
:: Sharp craft scissors
:: 5 inch piece of cardboard folded in half

Step one:
Wind the string around the cardboard. Using the chunky weight yarn, I wound approx. 25 times around.

Step two:
Cut the yarn and then cut another 6 inch piece of yarn.

Step three:
(apologies for the blurry photo)
Slide the yarn "ball" off of the cardboard, being careful not to unravel the loops. Gently center it on top of the 6 inch piece of yarn.

Step Four:
Use the 6 inch piece of yarn to tie a tight double knot in the center of the yarn "ball".

Step Five:
Using your scissors, cut the loops - make sure you DO NOT cut the knot you created in Step Four.

Step Six:
Trim and fluff the edges so they are all fairly even. That's it! You now have a happy little pom-pom!

I'm linking this post up to The Preschool Corner, Tot Tuesdays, Montessori Monday, We Play and Creative Friday.

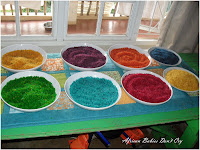
How to Make Rainbow Coloured Rice (Without Alcohol) for a Toddler Activity Sensory Bin

(Source: Africanbabydontcry.com)

I previously mentioned that I have been longing to make Jesse coloured rice to play with after seeing so many pretty pictures of it on Pinterest. I looked up a couple of recipe's and noticed they all used rubbing alcohol (surgical spirits) as the liquid to spread the colour over the rice. I don't really like the idea of my child playing with something covered in alcohol, besides the fact that it stinks, so I made up my own recipe, with great success! I used vinegar instead, and my colours came out just as, if not more vibrant.
Here is the recipe for my (almost natural) recipe for making rainbow coloured rice. I say almost natural as I used food colourants instead of natural dyes. I wanted vibrant colours and food colouring delivered. Now, while I don't allow my child to consume this poison, I figured that since the colouring has dried on the rice, and it does not come off the rice while playing in it, it is virtually safe. I'm not sure I would make finger-paint with food colouring as then the dye has a chance to be absorbed into his skin. Well that's my logic anyway.
Now for the how-to...
First, gather your supplies:
You will need:
- A large quantity of cheap rice, 'sweepings' would work well as it is not going to be consumed.
- White Vinegar
- Liquid food colouring in a variety of colours
- Re-sealable Bags - you will need one for each colour you want to make.
Place a few cups of rice into your re-sealable bags, depending on how large it is, and add a few drops of food colour. How many drops you use depends on the quality of you food colouring, I used a good quality and a cheap food colouring and achieved bright, deep colours with both, I just had to use more of the cheaper one. Add enough vinegar to wet all of the rice without soaking it. I used about a tablespoon of vinegar per cup of rice. The more you use, the easier it is to spread the colour, but the longer your rice takes to dry.
Seal your bag and shake the rice around letting the colouring completely dye the rice. If you find the colour is too weak, or there isn't enough to cover all the rice in your bag, add more.
Once you are convinced the rice is dyed empty it out onto a baking tray lined with tinfoil and place somewhere to dry.
I left it to dry overnight, although it was dry enough to move into bowls by the same evening.